
On this page · 8 sections
1. Get to know the kit 2. What will I need for my first test? 3. Choose for everyday use 4. Before your first reading 5. Your first test, step by step 6. What if something goes wrong? 7. Understanding & recording results 8. Caring for supplies & refillsGet to know the kit
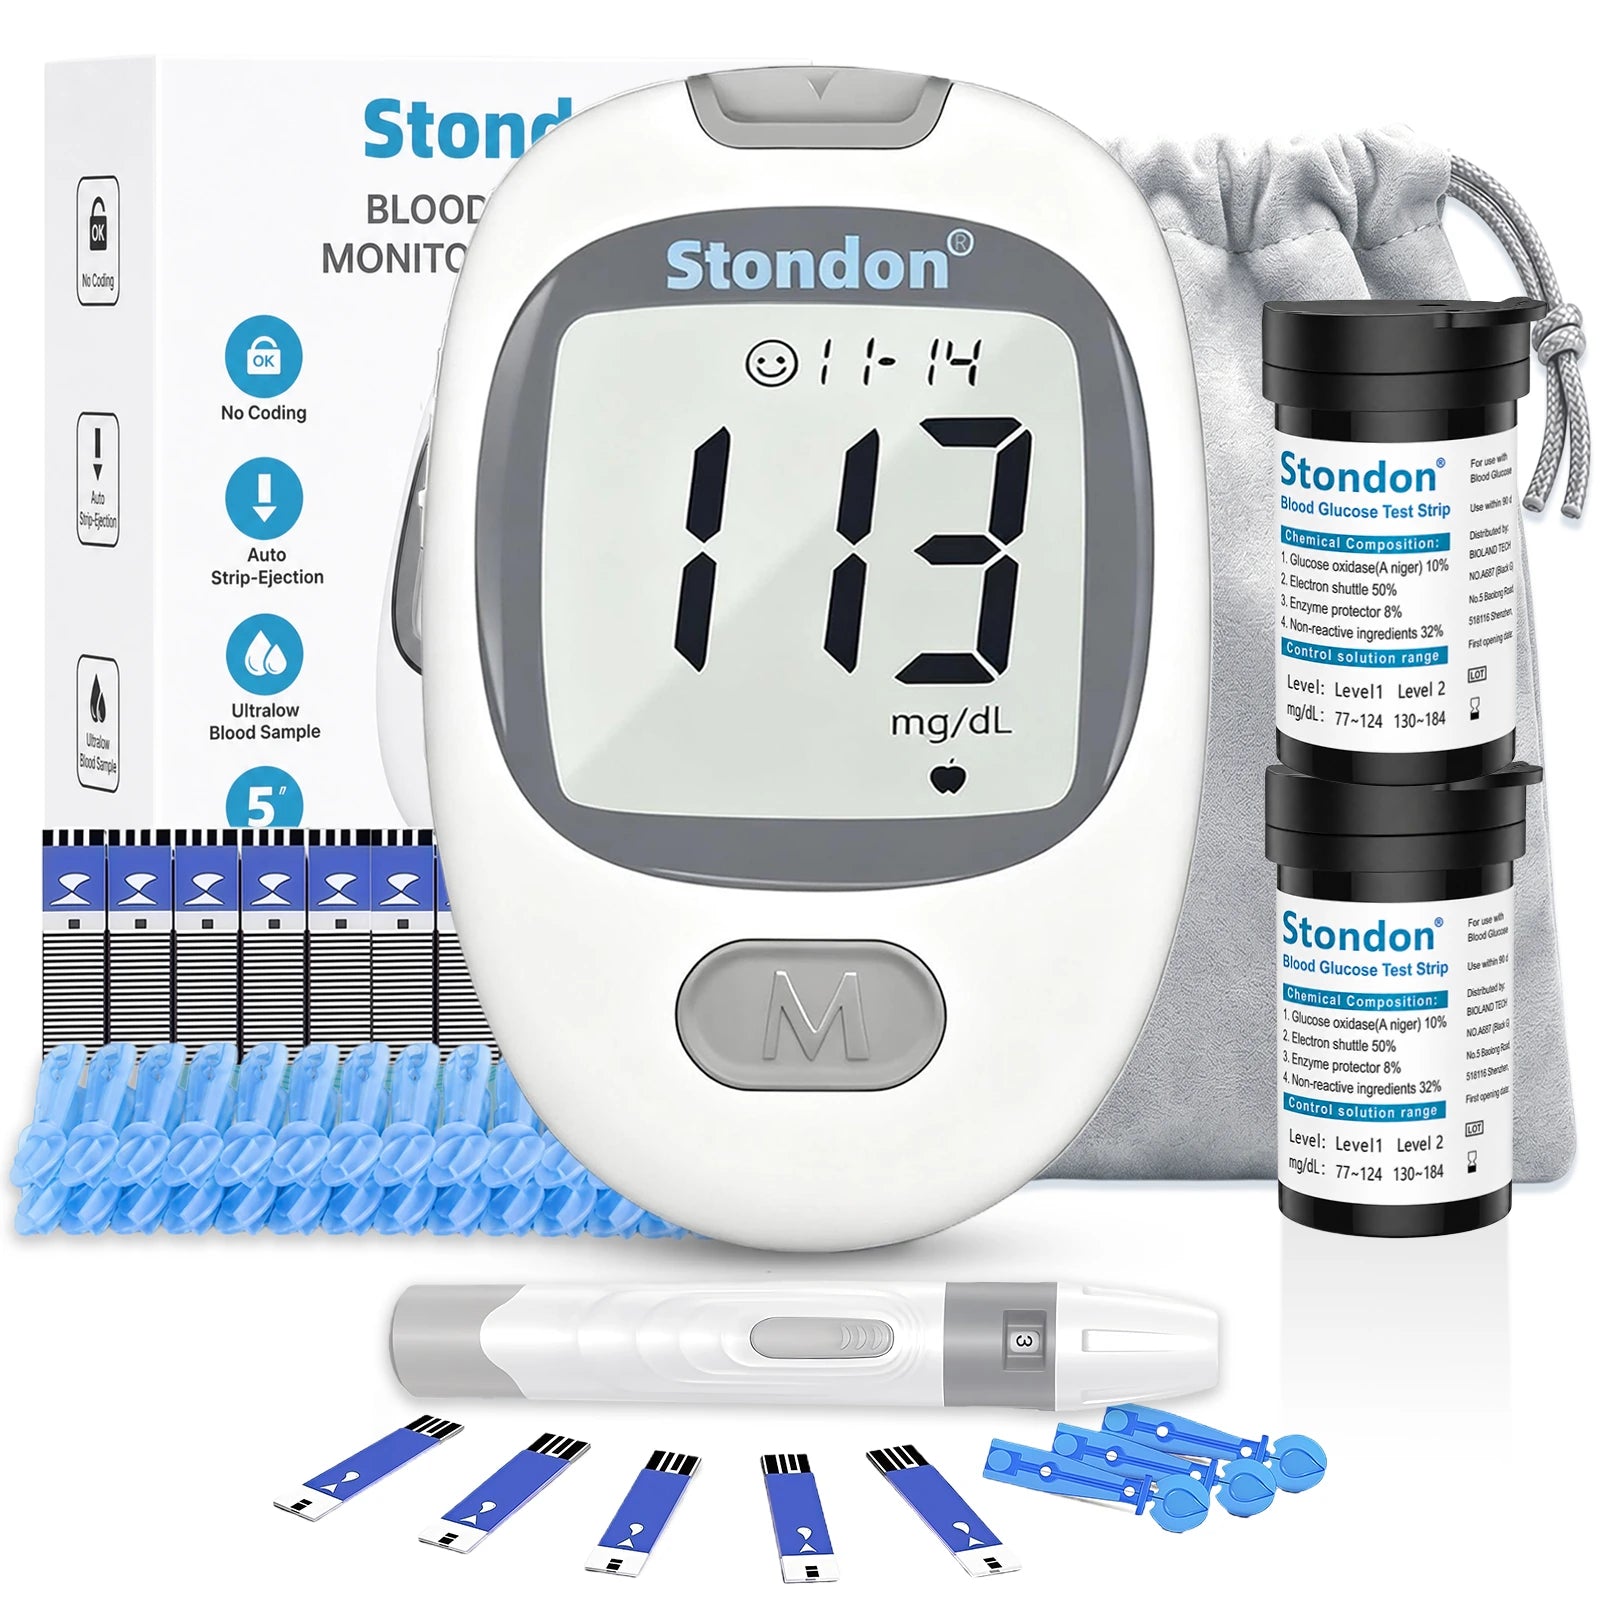
When you open your starter kit, each part has a simple, specific job to help you check your blood sugar safely and easily. Getting familiar with what each item is called and what it does makes testing much more comfortable before you begin.
These are the parts to recognize; check your selected kit’s packing list: A blood glucose meter is the handheld screen that reads your sample, shows your sugar level, and saves your previous test results. Test strips are small plastic strips that slide into the meter; they collect a tiny drop of blood on one end and send the reading to the meter. Use only the test strips specified for your exact meter. Do not assume that a similar-looking strip will work. A lancing device is a small, spring-loaded pen that holds the lancet and gently pricks your skin with an adjustable depth. A lancet is the sterile, very fine needle with a twist-off protective cap used for a single, quick prick.
Crucial distinctions for new buyers
Meter Kit vs. Refill Pack: A starter meter kit includes the meter device itself along with initial testing tools (such as the lancing device, sample lancets, starter strips, and carrying case). A refill pack provides extra strips and lancets for an existing meter; refill packs do not come with a new meter machine.
Fingertip Meter vs. CGM: A traditional fingertip meter takes a single, immediate reading whenever you test a drop of blood from your finger. It is different from a Continuous Glucose Monitor (CGM), which uses a wearable sensor to track glucose over time.
Electronic Meter
The digital screen that reads your sugar level, keeps past test logs, and houses the battery.
Compatible Test Strips (Vial)
Single-use strips kept inside a sealed moisture-safe vial. Each strip is used once.
Adjustable Lancing Device
The reusable pen holder that lets you choose a depth setting appropriate for your skin, following its instructions.
Sterile Single-Use Lancets
Gentle single-use needles with protective twist-off safety caps for obtaining a sample.
Storage Pouch & Manual Documentation
Zippered case for daily storage and travel, plus the manufacturer's instruction booklet.
What will I need for my first test?
Before you puncture your fingertip or unseal a fresh strip, take a moment to lay out your supplies on a flat, clean surface. Knowing the difference between what your specific kit box includes and what auxiliary supplies you may need to provide yourself prevents rushing in the middle of a test.
Packaging quantities and configurations vary between retailer options and bundled offers. Never assume every purchased box automatically includes batteries, control solution, or a medical sharps container.
Supplies to check in your selected kit Verify packaging
- ✓ The blood glucose meter: clean and undamaged.
- ✓ Matching test strips: within printed expiry date.
- ✓ Lancing device: inspect cap, cocking slide, and trigger.
- ✓ Fresh sterile lancets: intact twist-off shield.
- ✓ Model IFU manual: retain for official error codes.
Other supplies you may need Prepare beforehand
- • Soap and warm water: to clean hands thoroughly.
- • Clean dry towel or lint-free tissue: ensure dry skin.
- • Fresh batteries: 2× AAA (G-430) or 1× CR2032 (G-520).
- • Appropriate puncture-resistant sharps container
- • Logbook or digital tracker: to record readings with meal context.
Note on Control Solution
Control solution is a specialized aqueous glucose liquid used to verify that the electronic meter and test strip system are functioning accurately together under factory specifications. It is not blood, does not test the user's body, and is utilized strictly under the conditions outlined in the product’s official Instructions for Use (such as opening a new vial of strips or suspecting a dropped device).
Choose for everyday use
When comparing meters for regular home self-monitoring, focus on practical day-to-day usability factors rather than superficial marketing tags. The right unit is the one whose controls feel comfortable to hold, whose screen display is legible without eye strain, and whose strip reordering is predictable and affordable over months of monitoring.
Consider physical factors: how easily your fingers can grasp the strip out of its desiccant vial, how intuitive it is to slide the contact bars into the port, how you navigate through previous stored results, and whether the overall pouch fits your daily routine. Crucially, remember that the initial starter kit price represents only a small portion of ongoing care; the availability, packaging counts, and cost per test of future compatible strips represent the primary ongoing investment.
Model Comparison: Stondon G-430 vs. Stondon G-520
Compare the preparation steps, then check the exact kit option and matching strip name.
| Feature / Attribute | Stondon G-430 | Stondon G-520 |
|---|---|---|
| Power Source | 2× standard AAA batteries (user replaceable) | 1× 3V CR2032 coin cell battery (align with marked +/- polarity in compartment) |
| Starting a Test | Automatic wake upon inserting compatible strip | Automatic wake upon inserting compatible strip |
| Reviewing Past Memory | Front physical "M" (Memory) button | Lower physical "M" button |
| Measurement Units | mg/dL (US standard) | mg/dL (US standard) |
Stondon G-430
- Power Source
- 2× standard AAA batteries (user replaceable)
- Starting a Test
- Automatic wake upon inserting compatible strip
- Reviewing Past Memory
- Front physical "M" (Memory) button
- Measurement Units
- mg/dL (US standard)
Stondon G-520
- Power Source
- 1× 3V CR2032 coin cell battery (align with marked +/- polarity in compartment)
- Starting a Test
- Automatic wake upon inserting compatible strip
- Reviewing Past Memory
- Lower physical "M" button
- Measurement Units
- mg/dL (US standard)
Before your first reading
Taking your first reading calmly requires a brief mechanical setup. Before touching any lancet or strip, inspect your equipment to confirm that everything is intact, the power source is installed with correct polarity, and your workspace is clean, dry, and free of moisture or food residue.
When you first insert fresh batteries, most digital meters briefly flash all screen segments (an LCD segment check) and may prompt you to set the date and time. Maintaining an accurate date and time on your device ensures that your stored memory log corresponds accurately with your meals and medication schedule.
- • Slide open the rear battery compartment latch.
- • Insert two fresh AAA batteries observing exact (+) and (-) orientation marks.
- • Close the cover. Device powers on automatically when a strip is inserted fully into the top port.
- •Gently open the rear coin-cell battery cover.
- •Insert one fresh CR2032 3V coin cell battery, matching the marked (+/-) polarity symbols inside the battery compartment.
- •Snap the cover shut. Device turns on automatically when a compatible strip is pushed into the top port.
Your first test, step by step
Visual step-by-step sequence using verified instruction manual diagrams.

Wash and dry your hands
Make sure both AAA batteries are fitted in the marked +/− direction. Wash with soap and warm water, then dry thoroughly. Set out a fresh strip, your lancing device and a new sterile lancet.
Prepare the lancing device
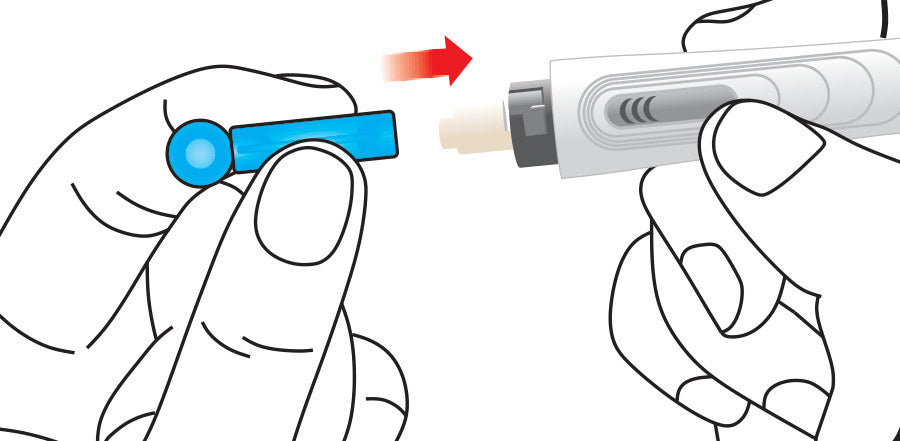
Remove the cap, insert a new lancet, twist off its protective cover and replace the device cap. Set the depth for your skin and pull back the cocking handle until it clicks.
Insert a new test strip
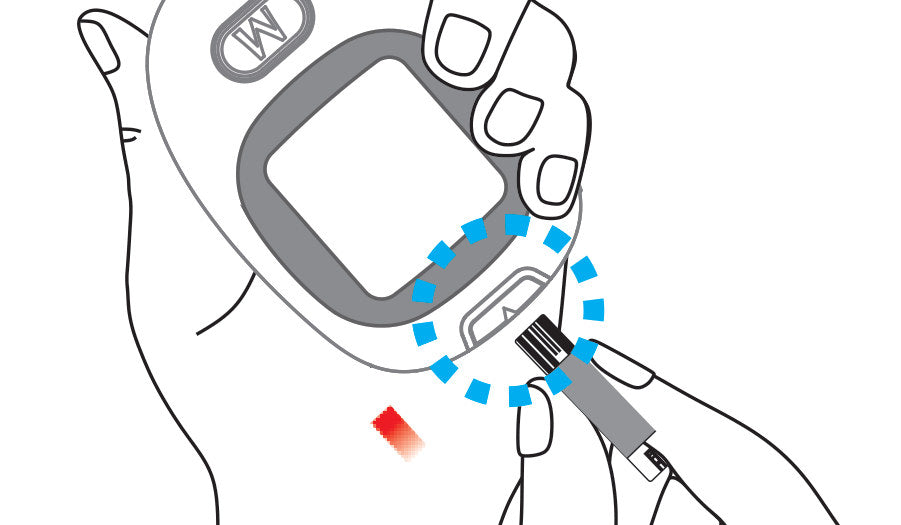
Take one strip out and close the vial immediately. Insert the contact-bar end fully into the meter, with the front side facing up. Wait for the flashing blood-drop symbol.
Prepare a fingertip sample
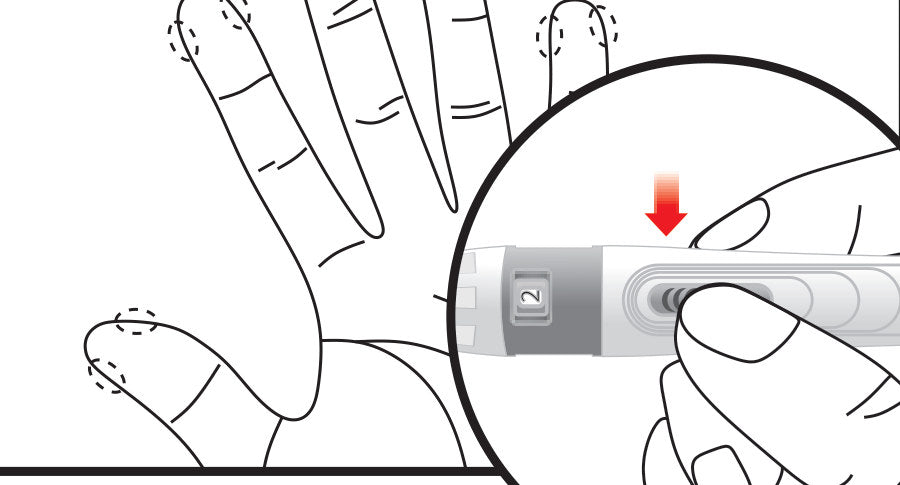
Hold the lancing device firmly against the side of your fingertip and press its release button. Wipe away the first drop and gently form a fresh drop.
Touch the strip tip to the drop
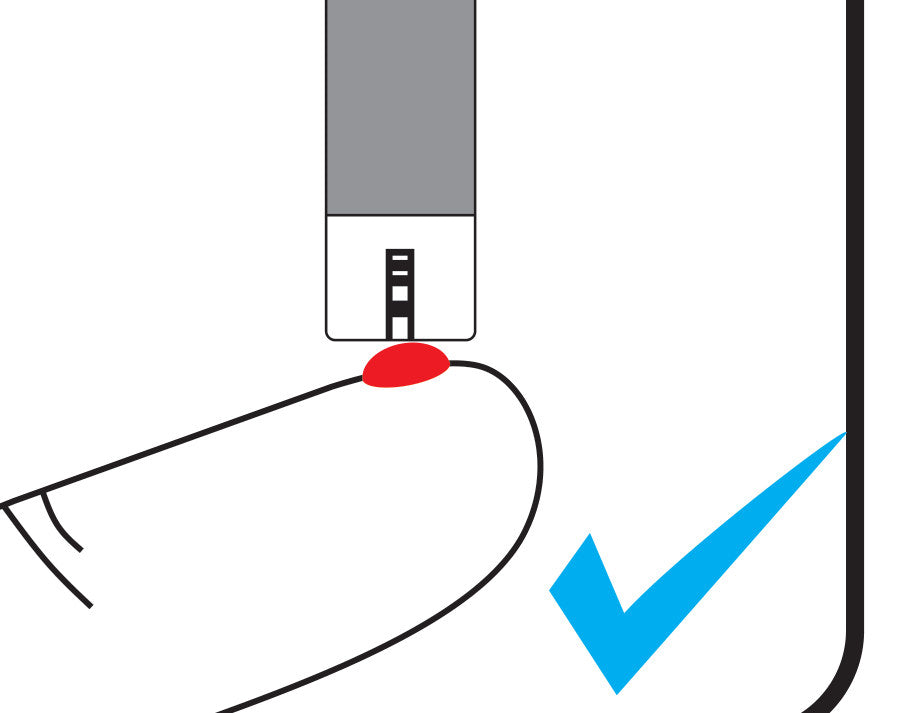
Bring the absorbent opening at the strip tip to the blood drop. Let it draw blood in until the confirmation window is filled and the meter beeps. Keep the strip in place for the 5-second countdown.
Read, then dispose safely
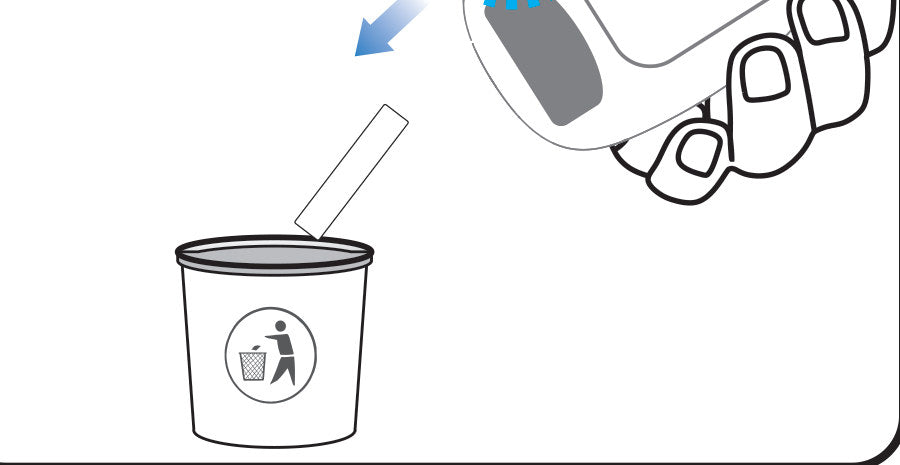
Read the result; it is stored automatically. Eject the used strip. Open the lancing-device cap, secure the lancet tip in its protective cover, then eject it into an appropriate sharps container. Wash your hands afterwards.
What if something does not go as expected?
If something does not go as expected, pause and check the display, strip and preparation steps. These checks can help you decide what to try next. A repeated problem needs further help; do not assume it is your fault.
| Situation Encountered | What to Check | Next Step to Take |
|---|---|---|
| Feeling nervous before the finger prick | Read through the entire sequence once before unsealing anything. Organize supplies calmly. | Always use a fresh, brand-new lancet and select a depth setting appropriate for your skin, following your lancing-device instructions. Lance the fleshy side of the finger rather than the center pad. |
| Blank screen after inserting strip | Strip inserted fully into port; battery orientation and charge. | Push the strip in until it stops with contact bars facing forward. If screen remains blank, check battery contacts and replace batteries. |
| No countdown begins after touching blood | Did the reaction chamber window fill completely? | Discard strip. Insert a fresh strip, wait for the flashing blood icon, and ensure the tip draws enough blood in one continuous touch. Never "top up" blood twice. |
Error code: E-U (G-430)
|
Used strip detected or strip was inserted with blood already applied. | Discard the used strip. Insert an unused strip with completely clean contact bars. (Applies specifically to G-430 model). |
Error code: E-F (G-430)
|
Strip was moved or removed while the 5-second countdown was underway. | Retest with a fresh strip. Keep the strip seated firmly in the meter port until the measurement numbers appear. |
| Reading does not match expectations | Hand washing residue (sugar on skin), expired strips, unsealed vial, or squeezing finger too hard. | Wash and dry hands again thoroughly. Retest using a fresh strip from a properly stored vial. If reading remains unexpected, follow your care plan. |
Do not assume every unexpected reading is user error, but avoid making unguided adjustments to prescription therapies. If a persistent technical error continues despite fresh batteries and strips, consult product support or your user manual.
Understanding and recording your result
In the United States, blood glucose is reported in milligrams of glucose per deciliter of blood (mg/dL). A single numeral displayed on your screen represents a snapshot of your capillary glucose concentration at that exact moment.
A reading cannot be interpreted in isolation: it must always be reviewed in the context of when you last ate, physical activity, illness, and the individualized target ranges established by your physician or diabetes care team. There is no single universal normal number that applies to every individual, and testing frequency varies widely from person to person.
Safety Reminder Regarding Medical Care
Never adjust prescription medication, insulin dosages, or clinical treatments solely based on this educational guide without consulting your healthcare provider. If you feel seriously unwell, faint, nauseated, or experience severe symptoms of high or low blood sugar, seek immediate medical attention rather than waiting for customer support.
Sample Personal Testing Log Format
| Date | Time | Context / Meal Tag | Result (mg/dL) | Notes (Activity / Symptoms) |
|---|---|---|---|---|
| 2026-11-03 | 07:30 AM | Fasting (Pre-breakfast) | ___ mg/dL | Felt well, normal rest |
| 2026-11-03 | 01:45 PM | 2-hr Post-lunch | ___ mg/dL | Salad and whole wheat bread |
Keeping consistent contextual notes helps your healthcare provider identify patterns during routine clinical reviews.
Look after your supplies, and plan your next refill
Keep strips in their original vial, close the cap immediately after removing one, and handle them with clean, dry hands. Follow the storage conditions printed on your strip label. Check both the printed expiration date and any after-opening discard date before testing.
When you first open a vial, write the opening date on the blank vial label. Always discard the strips whichever date arrives first according to the manufacturer instructions for your pack.
Cleaning and Device Maintenance
Clean and disinfect the meter and lancing device using the method and products specified in the instructions for your exact device. Keep liquid out of the strip port and battery compartment; never immerse the meter.
Before Reordering Replacement Strips
Refill boxes often look similar across different brands and models. Confirm your exact device details before submitting an order:
 Stondon ST-100 Blood Glucose Test Strips & Lancets
 Stondon ST-50 Blood Glucose Test Strips & Lancets
 Stondon G-520 Slim Blood Glucose Monitor Kit
 Stondon G-430 Classic Blood Glucose Monitor Kit


